Use the Tree Genie on a page when you want to be able to view hierarchical data such as a menu.
Note: Configure the Equipment Tree Genie to view equipment in your system.
The example below illustrates how the Genie can be used to view menu items within your system for a particular page. A basic example, the implementation of the tree Genie can also be used to display dynamic generated menu items using Cicode.
Example 1: Displaying Pre-configured Menu Items
Using the Example project, if you would like to display the menu items for the "_plant" page, complete the following:
In the Tree Genie property dialog configure the following fields:
|
Parameter |
Description |
|---|---|
|
Tree Name |
PlantMenu |
|
Width |
200 |
|
Number of rows |
10 |
|
Row Height |
15 |
|
Show CheckBox |
False (default) |
|
Force Child |
False (default) |
|
Window Inst |
True (default) |
|
Expand Level |
0 |
|
Menu (Page) Name |
_Plant |
|
Selected |
MenuNodeRunCommand(#Node) |
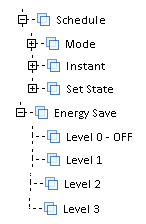
Compile and then run the project. At runtime the tree (menu) will look like the following:
Example 2: Displaying Dynamic Menu Items
This is the more versatile usage of the menu tree where you can create an in-memory menu hierarchy and populate it with your own data, and use the Tree control to display it on the screen. The EquipTree Genie is an example of such usage.
Example:'Mytree' initialization callback function:
		INT FUNCTION MyTreeInitialize(STRING sTreeName)
				// get the menu name for my instance of tree control
		STRING sMenu = LibTree_GetProperty(sTreeName, "Menu");
				// create a in-memory menu hierarchy
		INT hMenu = MenuGetPageNode(sMenu, 1);
		INT hNode;
				// populate the menu hierarchy (only once)
		IF (hMenu > -1) AND (MenuGetFirstChild(hMenu) < 0) THEN
				// add level 1 item
			hNode = MenuNodeAddChild(hMenu, "Item 1", "");
				// add level 2 (sub) items
			MenuNodeAddChild(hNode, "Sub-item 1", "");
			MenuNodeAddChild(hNode, "Sub-item 2", "");
				// add level 1 item
			hNode = MenuNodeAddChild(hMenu, "Item 2", "");
				// add level 2 (sub) items
			MenuNodeAddChild(hNode, "Sub-item 1", "");
			MenuNodeAddChild(hNode, "Sub-item 2", "");
				// add level 1 item
			MenuNodeAddChild(hMenu, "Item 3", "");
			END
				// return TRUE (1) to signal initialization completes
			RETURN 1;
			END
Save the Cicode file.
In the Tree Genie property dialog configure the following fields:
|
Parameter |
Description |
|---|---|
|
Tree Name |
TreeMenu |
|
Width |
200 |
|
Number of rows |
10 |
|
Show CheckBox |
True |
|
Force Child |
False (default) |
|
Window Inst |
True (default) |
|
Expand Level |
0 |
|
Menu (Page) Name |
MyMenu |
|
Initialize |
MyTreeInitialize("#Name") |
|
Selected |
MenuNodeRunCommand(#Node |
Assign the name of the in-memory menu hierarchy to the Menu name field of the Genie by assigning this name to the "Menu (Page) Name" field of the Tree Genie at configuration time.
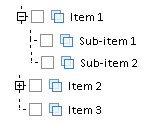
Compile and then run the project. At runtime the tree (menu) will look like the following:
See Also
Published June 2018