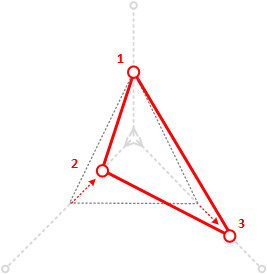
Citect SCADA allows you to associate a tag or Cicode expression with the vertices of a polygon. This means the shape of a polygon can be manipulated at runtime in response to values generated by a production system.
This is achieved by applying offset values to a vertex (in relation to its location) that define a path along which the vertex can move at runtime.
As the return value for the expression changes, the vertex will move along the path defined for it, altering the shape of the polygon.
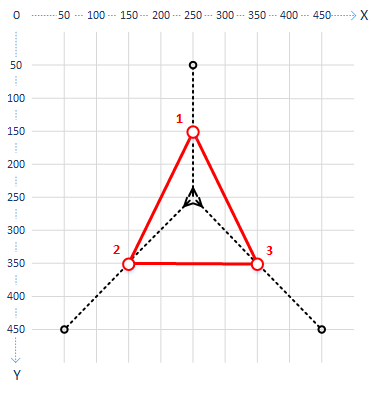
A triangle is placed on a graphics page with the following settings configured for its three vertices.
Vertex |
Location |
From Offset |
To Offset |
Specified Range |
||||
---|---|---|---|---|---|---|---|---|
|
X |
Y |
X |
Y |
X |
Y |
Min |
Max |
1 |
250 |
150 |
0 |
+100 |
0 |
–100 |
0 |
100 |
2 |
150 |
350 |
+100 |
–100 |
–100 |
+100 |
0 |
100 |
3 |
350 |
350 |
–100 |
–100 |
+100 |
+100 |
0 |
100 |
The following diagram shows the triangle with the path defined for each vertex by its offset values. In each case, the defined path starts at the center of the triangle and extends outwards.
To manipulate the shape of the triangle at runtime, the following expressions could be added to the vertices.
Vertex |
Expression |
---|---|
1 |
Tag1 |
2 |
Tag2 |
3 |
Tag3 |
Assuming the following list represents the current tag values, the triangle would appear as displayed below.
You can also apply a range to a vertex that specifies the start point and end point values for its path. By default, this range is set to 0—100.
If you need to accommodate a different range of return values for an expression, select the Specify Range option when configuring the vertex properties.
Polygon vertices have the following properties:
Property |
Description |
---|---|
[Vertices] Vertex |
A number automatically applied to each vertex in a polygon, based on the order in which they were drawn. To set the properties for a particular vertex, select it within this list. |
[Vertices] X |
The location of a vertex along the horizontal axis of the page (in pixels). Zero (0) represents the left edge of the page. |
[Vertices] Y |
The location of a vertex along the vertical axis of the page (in pixels). Zero (0) represents the top edge of the page. |
Expression for Vertex: <n> |
The tag value or Cicode expression used to determine the location of the selected vertex at runtime. As the return value for the expression changes, the vertex will move along the path defined by its offset values (see below). To insert a tag or a function, click the Wizard button to the right of this field. This button displays two options: Insert Tag and Insert Function. |
Specify Range |
Select this option if you would like to specify the start and end values for the vertex path. This option will be required if the return values from an expression span a different range to the default setting of 0—100. |
[Specify Range] Minimum |
Enter the minimum return value that you would like to use for the vertex range. When this value is returned, the vertex will shift to the location specified by the From Offset values. You can only enter a value here if you have selected the Specify range box. |
[Specify Range] Maximum |
Enter the maximum return value that you would like to use for the vertex range. When this value is returned, the vertex will shift to the location specified by the To Offset values. You can only enter a value here if you have selected the Specify range box. |
[From Offset] X |
The distance (in pixels) along a horizontal axis that the vertex will shift when the expression returns the minimum value in the specified range. You can shift the vertex to the left by entering a negative offset value. You can change the offset value by pressing the up and down arrows to the right of the field, or by directly entering a value. |
[From Offset] Y |
The distance (in pixels) along a vertical axis that the vertex will shift when the expression returns the minimum value in the specified range. You can shift the vertex towards the top of the page by entering a negative offset value. You can change the offset value by pressing the up and down arrows to the right of the field, or by directly entering a value. |
[To Offset] X |
The distance (in pixels) along a horizontal axis that the vertex will shift when the expression returns the maximum value in the specified range. You can shift the vertex to the left by entering a negative offset value. You can change the offset value by pressing the up and down arrows to the right of the field, or by directly entering a value. |
[To Offset] Y |
The distance (in pixels) along a vertical axis that the vertex will shift when the expression returns the maximum value in the specified range. You can shift the vertex towards the top of the page by entering a negative offset value. You can change the offset value by pressing the up and down arrows to the right of the field, or by directly entering a value. |
See Also
Published June 2018