Using Metadata
The following examples provide a guide into how you can implement metadata within your project. In the first example you will set parameters using metadata, and in the second example see how genie substitutions can be used in metadata.
In the first two examples a paint factory needs to control the amount of Cyan, Magenta, Yellow, and Key (Black) (CMYK), which is mixed to create different colors in their color chart.
The third example illustrates how substituting the equipment name, in an equipment.item reference when configuring a Super Genies lessens the need to define large amounts of metadata in the genie calling it.
 Example 1: Setting Parameters Using Metadata
- From the toolbox select the ‘number’ tool and in the Text Properties dialog configure as below. This is the pump that represents the color Cyan.

- Repeat to create the remaining pumps M_ PUMP, Y_ PUMP, B_ PUMP
Note:Add these pumps to the example project as Local Variable tags
- Create a button object. This button when selected at runtime will set the CMYK values for a specific color e.g Pine Green
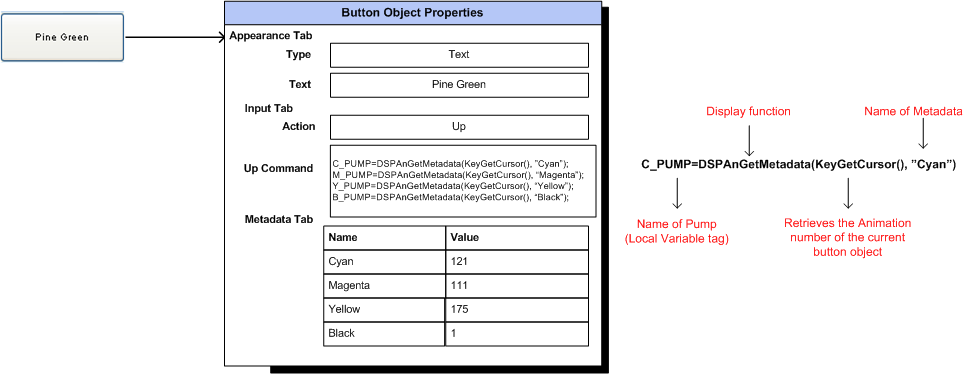
Note: For Display functions DspAnGetMetadataAt, DspAnSetMetadata, DspAnGetMetadata, and DspAnSetMetadataAt -2 is the default value used to retrieve the unique animation number for the button object.When you need to know the AN that triggered the input/command, the KeyGetCursor() function may be used as it returns the AN where the cursor is currently positioned.
- At runtime when the ‘Pine green’ button is selected the values of the metadata defined for Cyan, Magenta, Yellow and Black are retrieved and the relevant pumps set.
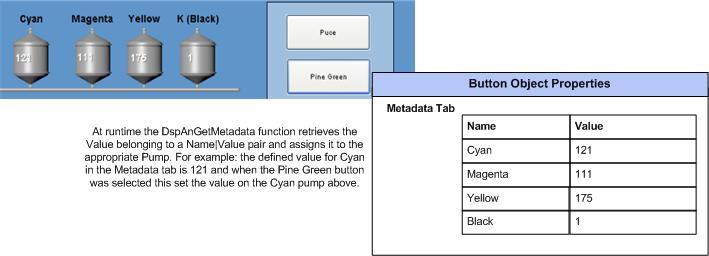
 Example 2: Using Genie Substitutions in Metadata
Instead of creating a new button for every color as you did in the previous example, you can create a genie and save it in the genie library. You can use the genie every time you need to create a new color button.Only needing to configure the name of the button and the CMYK values that belong to it.
- From File New-> Genie
- Add a button object onto the page
- Configure the button – the title of the button and the Value of the Metadata have been defined using genie substitutions e.g %Color% and %Cyan%.
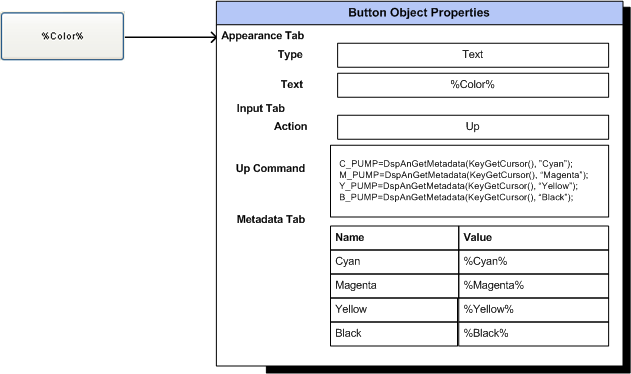
- Save the genie in the appropriate genie library
- At design time paste the genie onto the graphics page. A dialog will open prompting you for the name of the button, and the numeric values for Cyan, Magenta, Yellow and Black. In this example the name of the color is “Purple Heart”
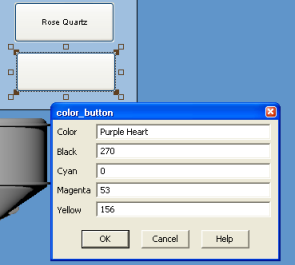
- At runtime when the ‘Purple Heart’ color button is selected the values of the metadata (that were entered in the genie prompt) are retrieved and the relevant pumps set.
 Example 3: Using Partial Associations in Metadata
Partial associations, where only part of the variable tag, or equipment.item reference is substituted (with a name)in the Super Genie, can now be used lessening the need to define large amounts of metadata which is not easily maintainable.
In this example you will:
- Create a Genie.
- Create a Super Genie Library object.
- Attach the Super Genie to the Genie.
- Paste onto a graphics page.
 Create the Genie
-
In the Citect Graphics Builder go to File | New | Genie.
- A new genie will open.
- From the graphics toolbox select the select the Button tool and click on the page to position it.
- Draw the button and in the Button properties dialog configure the following:
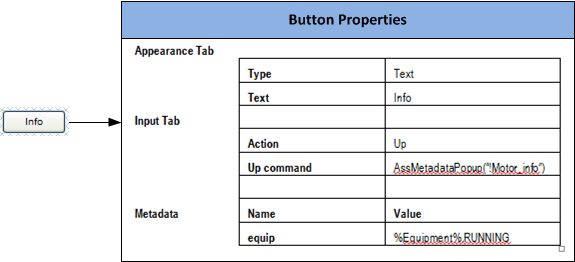
- Click OK to close the dialog and save the button properties
- Click the Save tool, or choose File | Save.
- Select the Project and Library in which to store the Genie.
- Name the Genie e.g. Motor_Genie and click OK to save
 Create a Super Genie Library Object
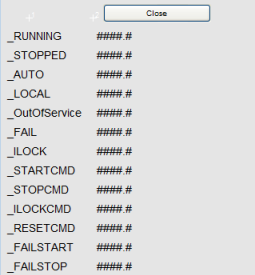
To create the Super Genie shown above:
- From the toolbar select New, or choose File | New.
- Click the Super Genie option.
- A blank Super Genie library object page will open.
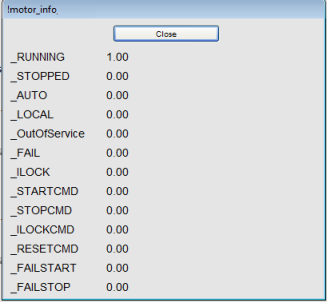
- In this example a pop up that displays 13 values will be created.
- Select the Text tool and click to position the text on the page and to open the Text properties dialog.
- In the text properties dialog enter _RUNNING.
- Repeat steps 5 and 6 for the remainder of the labels.
- Select the Numeric tool from the graphic toolbox and position next to the first label e.g _Running.
- Click to paste onto the page and to open the Text Properties dialog. Configure the Numeric expression as below with ?equip? being the substitution name.
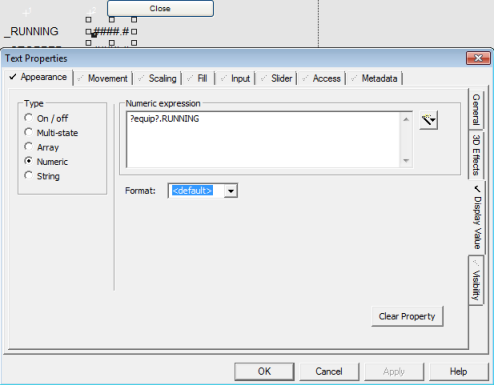
- Click OK to save the text object and close the dialog.
- Repeat steps 9 and 10 for the remaining equipment.items, matching the label with the end of the expression. For example ?equip?.STOPPED.
- Click OK to apply the changes.
- Select File | Save.
- In the Save dialog, select the project the page will belong to.
- Name the Super Genie page (e.g.!Motor_Info) and click OK.
- Once saved you will need to Attach the Super Genie to the Genie you created previously.
 Attach the Super Genie to a Genie
- Open the Genie
- With the Genie open, select Edit | Attach Super Genie.
- Click Add, and the Super Genie Dialog box will open.
- Select the library the Super Genie belongs to.
- Select the Super Genie to attach e.g. !motor_info and click OK.
- The Super Genie is added to the Attach Super Genie list.
- Click OK to save the changes, or click Cancel.
 Paste onto Graphics Page
- Create or open an existing graphics page
- From the graphics page select Edit|Paste Genie, browse for the genie you created previously and select it.
- On pasting the genie, the dialog will open prompting you to fill in the ‘Equipment’ field with the name of equipment for example Plant100.Area1.PumpHouse1.Motor01.
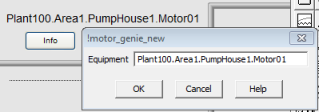
- The Equipment name entered will replace the value in the metadata tab (in your button as part of the genie). For example %Equipment% becomes Plant100.Area1.PumpHouse1.Motor01.
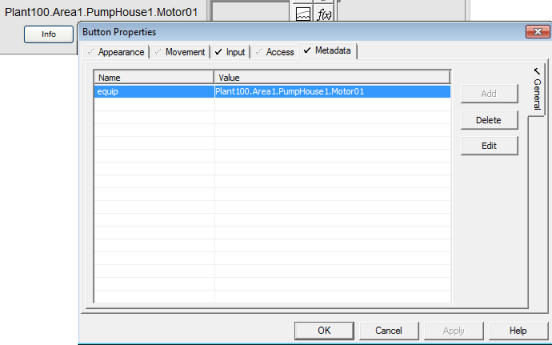
At runtime, when the ‘info’ button is pressed the values of the equipment are dynamically generated and assigned to the matching Super Genie Association. E.g. All occurrences of the substitution name ?equip? will be replaced with Plant100.Area1.PumpHouse1.Motor01 (creating the full equipment.item reference) and the values for the equipment.item displayed.
See Also
Published June 2018


