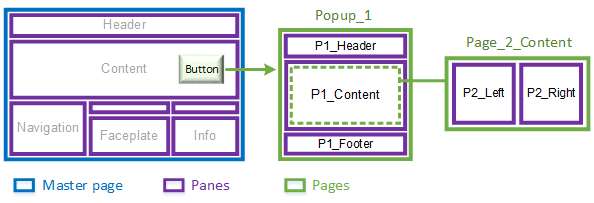
You can create a pop-up window that includes a set of panes.

In the example above, a button in the main content area launches a pop-up window called "Popup_1".
Popup_1 includes its own sets of panes:
The P1_Content pane is configured to display a page called "Page_2_Content", which in turn has two nested panes:
When displaying content, you can address the panes in a pop-up window using the following dot (.) notation. For example, you could use the following to address the P2_Left pane:
Popup_1.P1_Content.P2_Left
To launch a pop-up window, use the Cicode function
To create the required content for the window, perform the following tasks:
From the File menu, select Properties.
Or:
Right-click on the page and select Properties.
If you want to include panes on the page, you will also need to perform the following steps.
Property: HasPanes
Value: 1
This setting instructs the workspace to initialize the panes, display their default content, and consider them when contextual updates occur.
You can then add panes to the page using the procedure described in Create a Master Page for a Customized Workspace. Use the page you have just created, and start at step 3.
You can enable autofillling in a pop-up window. For example, you could use Popup_1 in the diagram above to display a report for a piece of equipment that is currently in context. To do this, you would use the following settings:
If you then want to display a report for a piece of equipment, you need to enter the names of the associated pages as a comma-separated list in the Content property for the equipment. In the example above, this would be "Page_2_Content, Report_1, Chart_1".
For more information, see the following:
See Also
Published June 2018