The TagDebugForm Cicode function displays a dialog that allows you to select a variable tag and perform some basic read/write operations on it. This function is useful for debugging or commissioning a project.
When the TagDebug form appears, you can perform the following tasks:
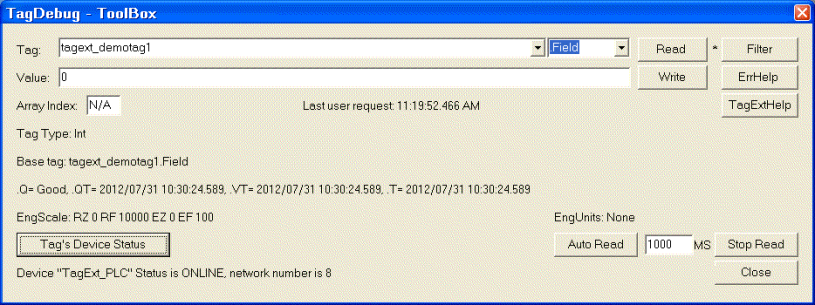
You can manually enter the name of the tag you would like to debug, or you can select it from the list included in the drop-down menu to the right of the Tag field. Be aware that the drop-down list is limited to 500 tags.
You can use the Filter button to help locate specific items from the tags database. A filter allows you to reduce the list of tags included in the tag drop-down menu to only those that match the characters specified in the Tag Filter dialog. To apply a filter, click on the Filter button and enter part of the name of the tag you would like to locate. The text entered can be a common suffix, it does not need to be the start of a tag name.
Click OK to apply the filter, or Clear to remove it.
If a filter is currently implemented, an "F" will appear next to the Filter button. An asterix (*) indicates no filter is currently being used.
Once you have a tag selected, you can specify additional properties in the field to the right of the Tag field. The drop-down menu includes a list of available extensions (for example, ".Field", ".Valid", ".Override", etc.). To automatically display these additional properties when a read occurs, you should use the drop-down menu in this field instead of manually adding an extension to a tag name.
The Read button will retrieve the value for the tag you have specified, or an error code will be displayed (for example, <Error 424: Tag not found>). Click on the ErrHelp button for more information about Cicode error codes.
If successful, a read will display the following information about the selected tag:
You view information for a particular item within a tag array using the Array Index field. This field allows you to specify the index number of the required item within the selected tag array.
To write a value to the selected tag, key in the required value and click on the Write button.
When a write has occurred, a log entry similar to the following will be added to the syslog.dat file:
<timestamp> TagDebug() Write: User 'Engineer' set tag 'Entry_ScrapWeight' to value ' 23.00' - NO ERROR
The Tag's Device Status button allows you to confirm if the host device for the selected tag is currently online. In most cases, this will be useful in determining the cause of an error code, for example, <Error 424: Tag not found>. Clicking the button will update the current status of the device.
The form allows for reads to be automatically repeated at a specified interval, allowing you observe how a tag value is changing over time.
Clicking the Auto Read button will start the read cycle; the Stop Read button will stop it. To adjust the read period, enter a value (milliseconds) in the field next to the Auto Read button.
Syntax
TagDebugForm()
Return Value
The name of the tag entered in the dialog.
Related Functions
TagDebug, TagInfo, TagRead, TagWrite
Example
TagDebug(); /* Display debug form to allow user to debug */
See Also
Published June 2018