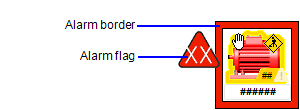
An alarm indicator can be used to show the occurrence and status of alarms associated with an object group or Genie. It consists of two main elements:

For more information, see Use Alarm Indicators.
Note: On Composite Genies, alarm indicators are displayed around each piece of related equipment included in the Composite Genie. You can also group individual independent objects, such as pumps, into am equipment group and apply an alarm indicator to the group. In this case, the equipment should be defined as "hidden" with its Hidden property set to TRUE.
To apply an alarm indicator to an object group or Genie:
When you return to Graphics Builder, the alarm indicator will appear on the graphics page around the object group or Genie.
Note:
• Using an Alarm Indicator with a group of Trend objects is not recommended.
• Genies that include legacy objects (from the v3.x/v4.x toolbox), do not support Alarm Indicators. If a Genie contains both a legacy object and a new object, then at runtime the alarm indicator will only be shown around the new object. If a Genie contains only legacy objects, an alarm indicator will not display.
|
Property |
Description |
|---|---|
|
Has Alarm Indicator |
Select this check box to apply an alarm indicator to the object group or Genie. |
|
[Highest priority |
Specifies the location in the equipment hierarchy that will be used to determine the highest priority alarm for the alarm indicator. You can choose to include alarm conditions that occur at locations down the equipment hierarchy (referred to as "children") by selecting one of the following options:
Be aware that any triggering alarms that occur down the equipment hierarchy will not appear in the Alarm Information Zone when the object is selected (see note below). By default, the page cluster context will be used. However, you can specify a particular cluster using dot (.) notation. You can also use Genie and Super Genie syntax. |
|
[Highest priority |
Select this check box to include equipment references when determining the highest priority alarm for an alarm indicator. Be aware that any triggering alarms that occur in referenced equipment will not appear in the Alarm Information Zone when the object is selected (see note below). |
|
[Border Appearance] |
Select this check box to locate the border within the extent of the object group or Genie. This means no additional space will be required to support a border. If this options is selected, Padding is disabled. |
|
[Border Appearance] |
Specifies the width of the alarm border (in pixels). |
|
[Border Appearance] |
Specifies the amount of space between the extent of the object group or Genie and the inside edge of the alarm border (in pixels). |
|
[Border Appearance] |
Specifies the color used for the inside and outside edge of the alarm border. Use the drop-down to select a color. |
|
[Flag Appearance] |
Select this check box to apply a flag to the alarm indicator. |
|
[Flag Appearance] |
Select the position for the alarm flag on the alarm border. The alarm flag will be attached to the outside edge of the alarm border at the specified location. |
Note: If you configure an alarm indicator to respond to alarm conditions that occur down the equipment hierarchy ("children") or within referenced equipment, these indirect alarms will not appear in the Alarm Information Zone when the object is selected at runtime. If this occurs for an object with an active alarm indicator, use a higher level alarm count or an alarm page to determine the location of the active alarm.
See Also
Published June 2018