A pane can display a page that includes its own set of panes, creating a multi-level arrangement of nested panes.
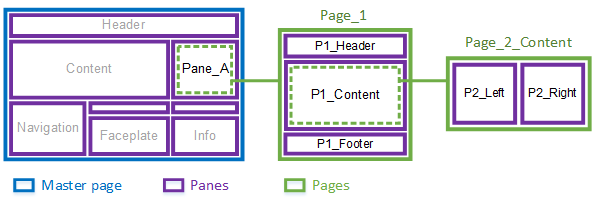
In the example above, Pane_A on the master page is configured to display a page called "Page_1".
Page_1 includes its own sets of panes:
The P1_Content pane is configured to display a page called "Page_2_Content", which in turn has two panes:
When displaying content, you can address nested panes using dot (.) notation. For example, you could use the following to address the P2_Left pane:
Pane_A.P1_Content.P2_Left
To use nested panes, you need to perform the following tasks:
From the File menu, select Properties.
Or:
Right-click on the page and select Properties.
Property: HasPanes
Value: 1
This setting instructs the workspace to initialize the panes, display their default content, and consider them when contextual updates occur.
Note: If you need to create a large number of pages for a custom-sized pane, consider creating a page template that matches the pane's size.
You can then add panes to the page using the procedure described in Create a Master Page for a Customized Workspace. Use the page you have just created, and start at step 3.
To enable autofillling in nested panes you use Content Types. For example, you could use Pane_A in the diagram above to display a report for a piece of equipment that is currently in context. To do this, you would use the following settings:
If you then want to display a report for a piece of equipment, you need to enter the names of the associated pages as a comma-separated list in the Content property for the equipment. In the example above, this would be "Page_1, Report_1, Chart_1".
For more information, see the following:
See Also
Published June 2018