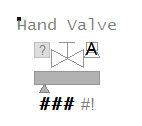
The handvalve object is used when there is a valve in the field that the board operator has no control over, but has feedback only.
Property | Description |
---|---|
Name |
Hand Valve |
Graphical Representation |
|
Example Equipment Template |
Valve |
Associated Composite Genie |
Valve.xml |
Equipment.Items the Genie expects |
|
Equipment Parameters the Equipment Items Expect | |
Associated Faceplate(s) |
|
Equipment.Items that the Faceplate expects |
|
Note: Check that the address configured for a valve in the PLC is the same as the tag address specified in Citect SCADA. If this is not configured correctly, the state and output value of the valve will not be accurate.
The following presentation options are available for this object.
Option |
Description |
---|---|
Equipment Name |
Enter a name for the piece of equipment. You can enter a maximum of 160 characters for this option. |
Equipment Item Prefix |
Specify the prefix and the equipment.item the prefix will be applied to. |
Valve Type |
Select the type of Valve - Block, Control or Damper, Hand. |
Size |
Size of the Valve - small or large. |
Orientation |
Select the orientation that is appropriate for the presentation of the object on the graphics page. Horizontal or Vertical. Horizontal is selected by default. |
Fail Type |
Select the fail action for the valve (open, closed, or last). |
Display Label |
Use this setting to display a label at the selected position. Select None if you do not want to display a label. |
Label |
Enter the text that will display at the location specified in Display Label field. You can enter a maximum of 30 characters for this option. |
Display Alarm Indicator |
Select this option to display an alarm indicator which indicates the highest priority alarm and its state for this Valve's equipment. |
Display Alarm Flag |
Use this setting to display an alarm flag at the selected position. Note: If you select the same position for the alarm flag and Display Status indicator (see below), they will overlap. The alarm flag will not be visible. |
Display Status Indicator |
Select the location to display a status indicator. Select None if you do not wish to see the status indicator. For more information, see Status Indicators. |
Display Output Bar |
Select this option to display a field control or computer control for this object. |
Display OOS |
Select this option to display an out of service indicator. |
Display Control Mode |
Select this option to display a mode indicator for the object. |
Display Readback |
The Display Readback represents the actual output for the controller. |
Display Value |
Select this option to display the output value. |
See Also
Published June 2018